others-prepare for cks exam with me 2: Linux ssh hardening
1. Purpose
In this post, I would continue to write posts about preparing for the CKS (Certified Kubernetes Security Specialist) exam. I would write my own notes about the exam, and you can refer to these articles to prepare your own.
List of the series of posts:
-prepare for cks exam with me 1: Linux user and group management
-prepare for cks exam with me 2: Linux ssh hardening
-prepare for cks exam with me 3: Linux remove obsolete packages and services
-prepare for cks exam with me 4: Linux kernal hardening
-prepare for cks exam with me 5: Linux UFW(Uncomplicated firewall)
-prepare for cks exam with me 6: Seccomp in Linux, Docker and Kubernetes
-prepare for cks exam with me 7: Apparmor in Linux, Docker and Kubernetes
-prepare for cks exam with me 8: Security context in Kubernetes
-prepare for cks exam with me 9: Admission controllers in Kubernetes
-prepare for cks exam with me 10: Pod security policy in Kubernetes
-prepare for cks exam with me 11: Open policy agent in Kubernetes
-prepare for cks exam with me 12: Secrets in Kubernetes
-prepare for cks exam with me 13: Container runtimes(gvisor/kata containers) in Kubernetes
-prepare for cks exam with me 14: Container Image security in Docker and Kubernetes
-prepare for cks exam with me 15: How to print docker images of all pods in kubernetes
2. Environment
3. The linux SSH hardening
3.1 Frequently used SSH commands
The commands that are frequently used with SSH:
3.1.1 SSH Login
ssh node01
ssh user@node01
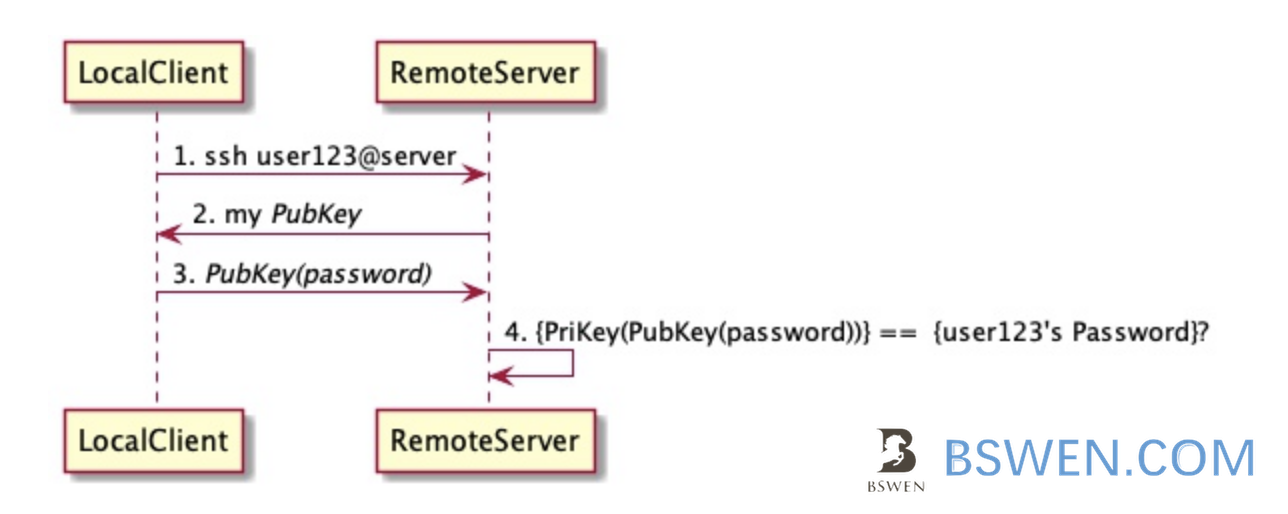
3.1.2 SSH passwordless login ( certificate based login)
The following commands include creating the public/private keypair and copying the public key to the server:
# The id_rsa and id_rsa.pub files in the local .ssh directory record the private key and public key
ssh-keygen -t rsa

# copy mark's public key to node01, then we can login to node01 using 'mark' without password
# On node01, the file '.ssh/authorized_keys' records the public key of the clients
ssh-copy-id mark@node01
The pubkey based authentication can be depicted by the following diagram:
3.1.3 Disabling root user from login with password
vi /etc/ssh/sshd_config
PermitRootLogin no # Note this line, no means root remote login is not allowed
PasswordAuthentication no # Password-based authentication is not allowed

# After modification, restart the sshd service:
Systemctl restart sshd

# View authentication logs
tail /var/log/secure
3.2 The explanation of /etc/ssh/sshd_config file
The /etc/ssh/sshd_config file is the system-wide configuration file for OpenSSH which allows you to set options that modify the operation of the daemon. This file contains keyword-value pairs, one per line, with keywords being case insensitive.
Here is the explanation line by line:
#Port 22 //This is the listening port of the ssh service. Generally, the default port 22 is not used in the actual production environment
#AddressFamily any //any default ipv4 ipv6
#ListenAddress 0.0.0.0
#ListenAddress ::
ListenAddress is used to set the IP address bound to the sshd server; the listening host adapter card, for example, if you have two IPs, 192.168.0.11 and 192.168.2.20, then you only want to open 192.168.0.11 , It can be set as: ListenAddress 192.168.0.11 means that only SSH connections from the IP 192.168.0.11 are monitored. If you don’t use the settings, all interfaces will accept SSH by default
RSA private key used by HostKey /etc/ssh/ssh_host_rsa_key
HostKey /etc/ssh/ssh_host_ecdsa_key
HostKey /etc/ssh/ssh_host_ed25519_key

# Logging
#SyslogFacility AUTH
SyslogFacility AUTHPRIV log
#LogLevel INFO
# Authentication:
#LoginGraceTime 2m Grace login time without entering a password two minutes to automatically log out

#PermitRootLogin yes is changed to no to prevent root connection (logging in ordinary users can switch to root)
#StrictModes yes Check the owner, permissions, etc. of the .ssh/file
#MaxAuthTries 6 General 6/2=3 of the maximum number of authentications
#MaxSessions 10 Maximum connections for clone sessions
#PubkeyAuthentication yes supports public key authentication (generally open public key authentication and close user login)
# The default is to check both .ssh/authorized_keys and .ssh/authorized_keys2
# but this is overridden so installations will only check .ssh/authorized_keys
AuthorizedKeysFile .ssh/authorized_keys
#AuthorizedPrincipalsFile none
#AuthorizedKeysCommand none
#AuthorizedKeysCommandUser nobody
# For this to work you will also need host keys in /etc/ssh/ssh_known_hosts
#HostbasedAuthentication no
# Change to yes if you don't trust ~/.ssh/known_hosts for
# HostbasedAuthentication
#IgnoreUserKnownHosts no
# Don't read the user's ~/.rhosts and ~/.shosts files
#IgnoreRhosts yes
# To disable tunneled clear text passwords, change to no here!
#PasswordAuthentication yes
#PermitEmptyPasswords no (Are empty passwords allowed?) Reject user login (usually turn on public key authentication and turn off user login)
PasswordAuthentication yes
# Change to no to disable s/key passwords
#ChallengeResponseAuthentication yes
ChallengeResponseAuthentication no

# Kerberos options
#KerberosAuthentication no
#KerberosOrLocalPasswd yes
#KerberosTicketCleanup yes
#KerberosGetAFSToken no
#KerberosUseKuserok yes

# GSSAPI options
GSSAPIAuthentication yes//Changed to no here is to speed up the connection
GSSAPICleanupCredentials no
#GSSAPIStrictAcceptorCheck yes
#GSSAPIKeyExchange no
#GSSAPIEnablek5users no

UsePAM no
#AllowAgentForwarding yes
#AllowTcpForwarding yes
#GatewayPorts no (Gateway)
X11Forwarding yes
#X11DisplayOffset 10
#X11UseLocalhost yes
#PermitTTY yes
#PrintMotd yes
#PrintLastLog yes
#TCPKeepAlive yes
#UseLogin no
#UsePrivilegeSeparation sandbox
#PermitUserEnvironment no
#Compression delayed
#ClientAliveInterval 30 (If there is no operation, the connection will be disconnected as soon as 30 seconds have passed)
#ClientAliveCountMax 0 (If there is no operation, the connection will be disconnected as soon as 30 seconds have passed)

#ShowPatchLevel no
#UseDNS yes //Changed to no here is to speed up the connection
#PidFile /var/run/sshd.pid //The running service number
#MaxStartups 10:30:100 //When the number of connections exceeds 10, the user will be rejected with a failure rate of 30% (100% rejected)
#PermitTunnel no
#ChrootDirectory none
#VersionAddendum none
# no default banner path


#Banner none //ssh login prompt message
Banner /etc/ssh/banner.txt //ssh login to read content
# Accept locale-related environment variables
AcceptEnv LANG LC_CTYPE LC_NUMERIC LC_TIME LC_COLLATE LC_MONETARY LC_MESSAGES
AcceptEnv LC_PAPER LC_NAME LC_ADDRESS LC_TELEPHONE LC_MEASUREMENT
AcceptEnv LC_IDENTIFICATION LC_ALL LANGUAGE
AcceptEnv XMODIFIERS
AllowUsers wang //This line is not added by default, only allow Internet users to log in (including root) whitelist
DenyUsers blacklist (high priority)

AllowGroups
DenyGroups
# override default of no subsystems
Subsystem sftp /usr/libexec/openssh/sftp-server
# Example of overriding settings on a per-user basis
#Match User anoncvs
# X11Forwarding no
# AllowTcpForwarding no
# PermitTTY no
# ForceCommand cvs server
For PasswordAuthentication and PubkeyAuthentication, there are default values for them:
According to this document:
PasswordAuthentication
Specifies whether password authentication is allowed. The default is ''yes’'.

PubkeyAuthentication
Specifies whether public key authentication is allowed. The default is ''yes''. Note that this option applies to protocol version 2 only.
So , the PasswordAuthentication and PubkeyAuthentication are both enabled by default.
3.3 The privilege escalation using sudo
3.3.1 /etc/sudoers management
Users can request root privileges without having the root password using sudo, what is sudo?
Sudo stands for either “substitute user do” or “super user do” (depending upon how you want to look at it). What sudo does is incredibly important and crucial to many Linux distributions. Effectively, sudo allows a user to run a program as another user (most often the root user). There are many that think sudo is the best way to achieve “best practice security” on Linux. There are some, however, that feel quite the opposite. Regardless of where you stand, and what distribution you are currently using, there will come a time when you will have to take advantage of sudo. Whether you will need to simply use sudo or you will have to configure sudo you will want to know the ins and outs of this powerful tool.
The sudoers are stored in this file:
cat /etc/sudoers
The format and example settings of sudoers:
##format:
## user MACHINE=COMMANDS

#Example 1:
## Allow root user to execute any command under any path
root ALL=(ALL) ALL

## Allow users in the wheel user group to execute all commands
%wheel ALL=(ALL) ALL

## Allow users in the wheel user group to use all commands without entering the user's password
%wheel ALL=(ALL) NOPASSWD: ALL
If you want to change this file, you should use visudo instead of vi:
visudo
After editing, click ctrl+x and Y to save and exit.
3.3.2 What is visudo?
You use visudo mostly to prevent from breaking your system. … visudo locks the sudoers file against multiple simultaneous edits, provides basic sanity checks, and checks for parse errors. If the sudoers file is currently being edited you will receive a message to try again later.
- Visudo uses vi to open the /etc/sudoers file, but when saving and exiting, visudo will check the internal grammar to prevent users from entering wrong information
- Visudo requires root privileges
- [root@localhost ~]$ visudo
3.3.3 How to use sudo without password?
Edit /etc/sudoers with visudo
Suppose you have a user tom, who want to use sudo without password, then set as follows:
tom ALL=(ALL) NOPASSWD:ALL
5. Summary
In this post, I write some examples about how to do SSH hardening when using linux operating systems.