others-how to push messages to web pages in real time by using redis and websocket with spring boot?
1. Purpose
In this post, I would demo how to push a message from command line to web pages in real time, just as the following pictures show:
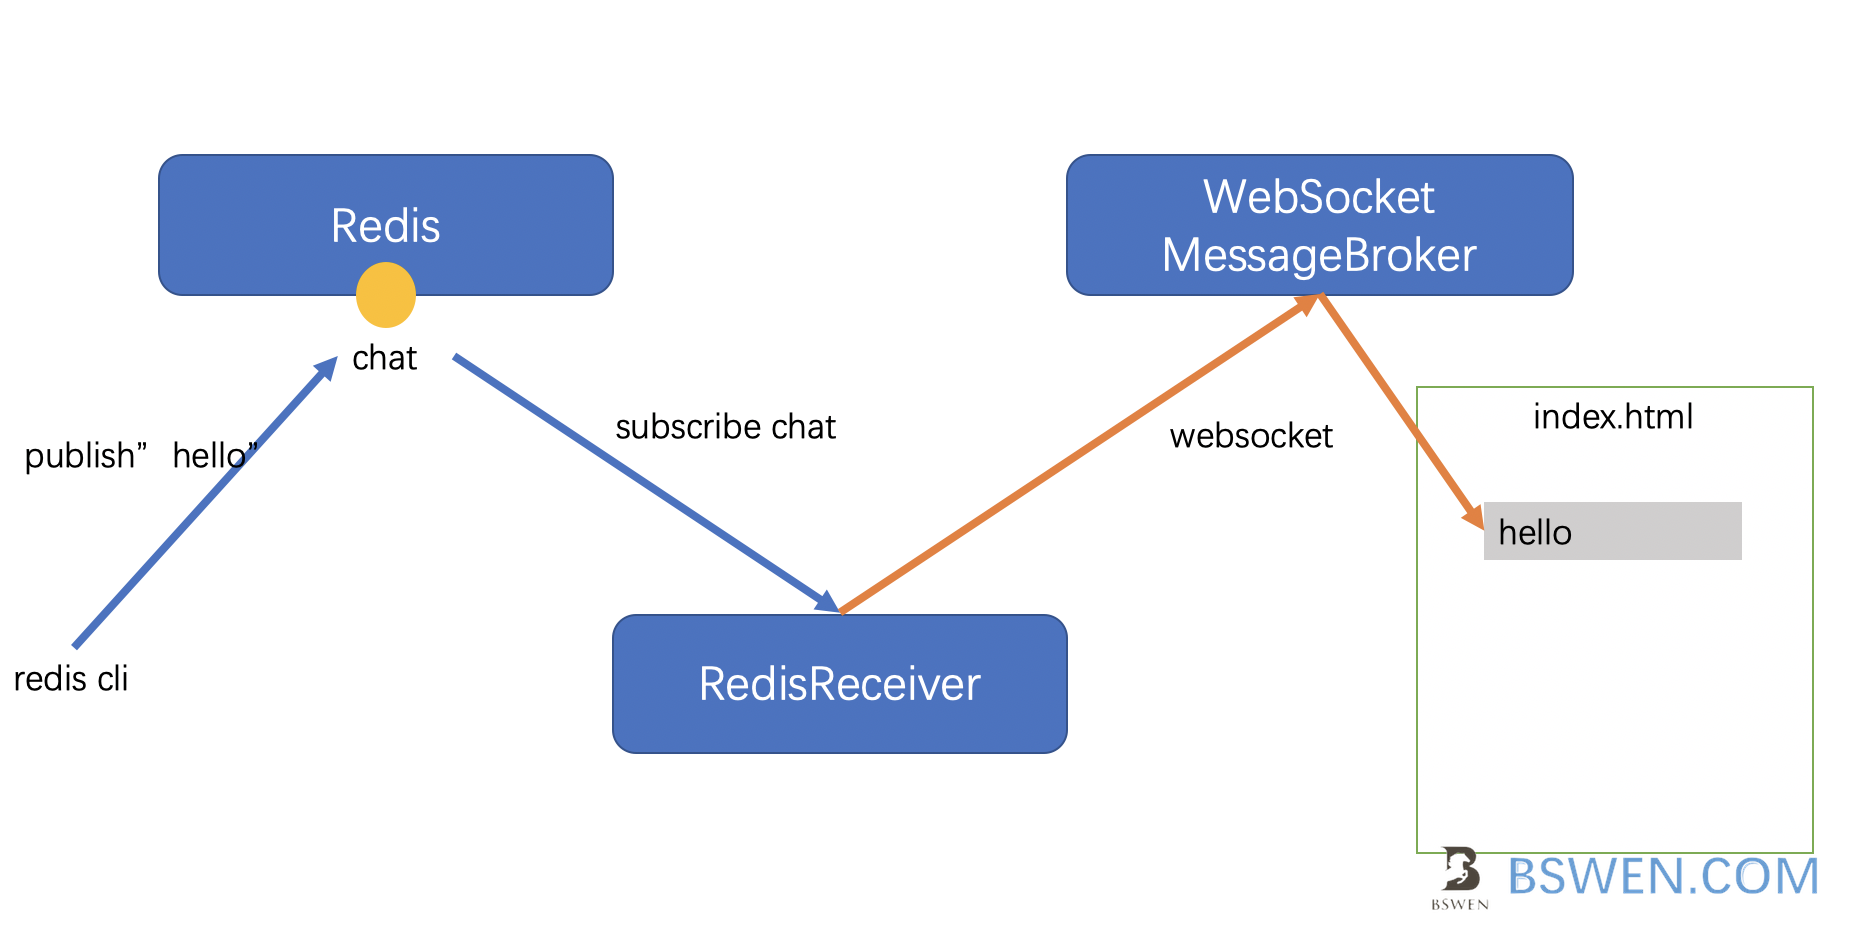
- User opens a command line to connect to redis server
- User
publisha messagehelloto redis channel - A
RedisReceiversubscribes to Redis Server, when it receives a new message, it would send it to a websocket message broker - A web page is subscribed to the websocket topic, when new message comes, it would display it on the page.
Here is the video :
2. Environment
- Spring boot 2.4
- Java 1.8
3. The solution
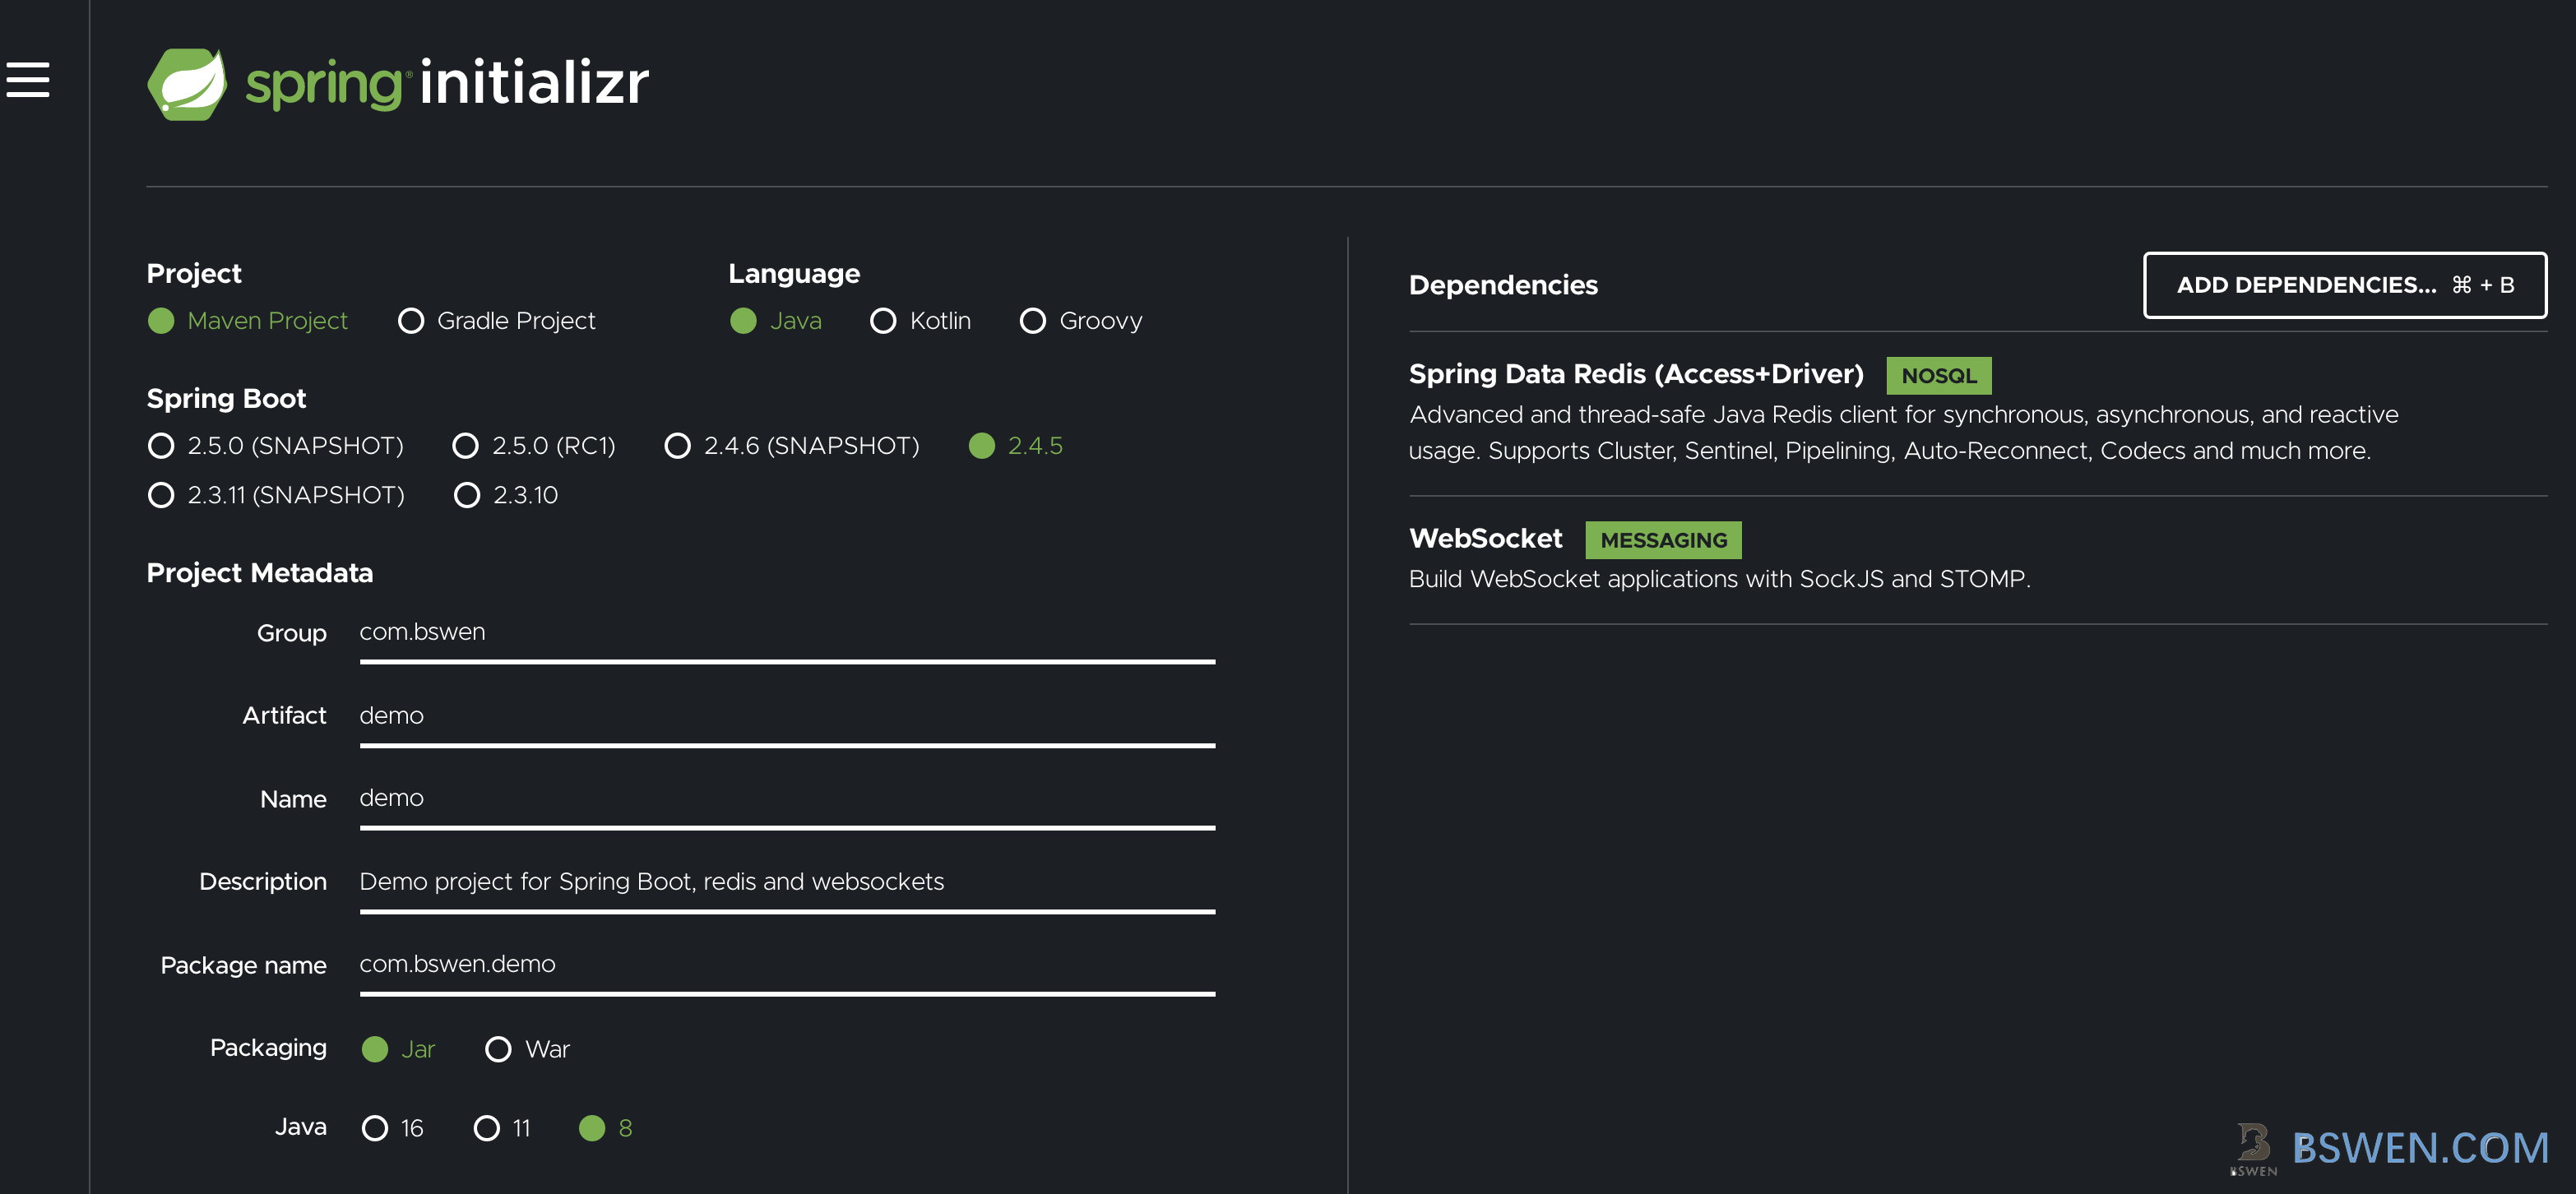
3.1 Initialize a spring boot project
Just navigate to https://start.spring.io to generate a template project for us.
What is start.spring.io or spring initializr?
The quickest way to generate Spring Boot projects is through start.spring.io. The site provides a curated list of dependencies that you can add to your application based on the selected Spring Boot version. You can also choose the language, build system and JVM version for the project.
We define the following for our project:
- We use
mavento do the dependency management - We choose Spring Boot 2.4.5 for test
- We define package as com.bswen.demo, you can define you own
- We choose the packaging as
jar, which would generate a jar file to execute - We choose jdk 1.8 for test
- And we choose the following dependencies:
- Spring data redis: We use it to connect to redis server
- Spring websocket: We use it to setup a websocket message broker
And finally we get the following dependencies in our pom.xml(maven):
<properties>
    <start-class>com.bswen.websocket1.Websocket1Main</start-class>
    <java.version>1.8</java.version>
		<project.build.sourceEncoding>UTF-8</project.build.sourceEncoding>
</properties>

<dependencies>
    <dependency>
        <groupId>org.springframework.boot</groupId>
        <artifactId>spring-boot-starter-websocket</artifactId>
    </dependency>

    <dependency>
        <groupId>org.springframework.boot</groupId>
        <artifactId>spring-boot-starter-data-redis</artifactId>
    </dependency>

    <dependency>
        <groupId>org.springframework.boot</groupId>
        <artifactId>spring-boot-starter-test</artifactId>
        <scope>test</scope>
    </dependency>

    <dependency>
        <groupId>org.webjars</groupId>
        <artifactId>webjars-locator-core</artifactId>
    </dependency>
    <dependency>
        <groupId>org.webjars</groupId>
        <artifactId>sockjs-client</artifactId>
        <version>1.0.2</version>
    </dependency>
    <dependency>
        <groupId>org.webjars</groupId>
        <artifactId>stomp-websocket</artifactId>
        <version>2.3.3</version>
    </dependency>
    <dependency>
        <groupId>org.webjars</groupId>
        <artifactId>bootstrap</artifactId>
        <version>3.3.7</version>
    </dependency>
    <dependency>
        <groupId>org.webjars</groupId>
        <artifactId>jquery</artifactId>
        <version>3.1.1-1</version>
    </dependency>

    <dependency>
        <groupId>com.google.code.gson</groupId>
        <artifactId>gson</artifactId>
        <version>2.8.6</version>
    </dependency>
</dependencies>

	<build>
		<plugins>
			<plugin>
				<groupId>org.springframework.boot</groupId>
				<artifactId>spring-boot-maven-plugin</artifactId>
			</plugin>
		</plugins>
	</build>
Pay attention to the webjars dependencies, we would use them in the web pages.
3.2 Start a redis server
We can start a redis server quickly by using docker, you can follow this guide to start the redis docker server, for short, we can do as follows:
$ sudo docker run --name my-first-redis -d redis
Then , check the running redis server by this command:
$ sudo docker ps
At last, if you want to use redis-cli command line, you can do as follows:
$ sudo docker exec -it my-first-redis sh
# redis-cli
127.0.0.1:6379>
Now we have a working redis server.
3.3 Develop a RedisReceiver to subscribe the redis pubsub messages
Now we have a running redis server and we can connect to the server via redis-cli command line. When user send a message to the redis pubsub topic, we should process the message.
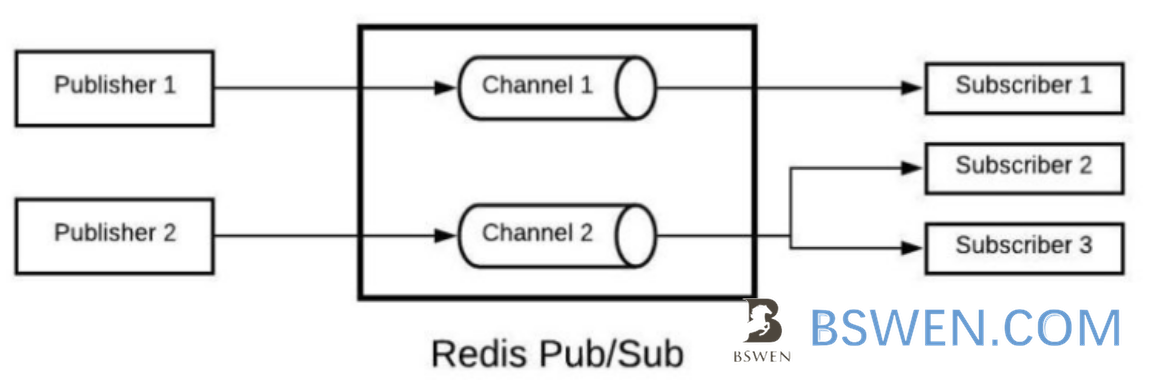
Redis Pub/Sub implements the messaging system where the senders (in redis terminology called publishers) sends the messages while the receivers (subscribers) receive them. The link by which the messages are transferred is called channel. In Redis, a client can subscribe any number of channels.
Now we have a publisher(via redis-cli), we should build a subscriber to listen for the new messages from redis server.
Here is the code.
First ,define a RedisMessageListenerContainer to listen to the redis pub/sub messages:
import com.bswen.websocket1.service.RedisReceiver;
import org.slf4j.Logger;
import org.slf4j.LoggerFactory;
import org.springframework.context.annotation.Bean;
import org.springframework.context.annotation.Configuration;
import org.springframework.data.redis.connection.RedisConnectionFactory;
import org.springframework.data.redis.core.StringRedisTemplate;
import org.springframework.data.redis.listener.PatternTopic;
import org.springframework.data.redis.listener.RedisMessageListenerContainer;
import org.springframework.data.redis.listener.adapter.MessageListenerAdapter;


@Configuration
public class RedisConfig {
    private static final Logger LOGGER = LoggerFactory.getLogger(RedisConfig.class);

    @Bean
    RedisMessageListenerContainer container(RedisConnectionFactory connectionFactory,
                                            MessageListenerAdapter listenerAdapter) {

        RedisMessageListenerContainer container = new RedisMessageListenerContainer();
        container.setConnectionFactory(connectionFactory);
        container.addMessageListener(listenerAdapter, new PatternTopic("chat"));

        return container;
    }

    @Bean
    MessageListenerAdapter listenerAdapter(RedisReceiver receiver) {
        return new MessageListenerAdapter(receiver, "receiveMessage");
    }

    @Bean
    StringRedisTemplate template(RedisConnectionFactory connectionFactory) {
        return new StringRedisTemplate(connectionFactory);
    }
}
In the above code, we do the following jobs:
- Build a
StringRedisTemplateto access redis - Build a
MessageListenerAdapterto process the message, when new messages arrive, spring boot would call the methodreceiveMessageinRedisReceiver - Build a
RedisMessageListenerContainer,which listens to the topic ‘chat’ of redis server.
In RedisServer, we can process the message like this:
import java.util.concurrent.atomic.AtomicInteger;

import com.bswen.websocket1.domain.Greeting;
import com.google.gson.Gson;
import org.slf4j.Logger;
import org.slf4j.LoggerFactory;
import org.springframework.beans.factory.annotation.Autowired;
import org.springframework.messaging.simp.SimpMessagingTemplate;
import org.springframework.stereotype.Component;

@Component
public class RedisReceiver {
    private static final Logger LOGGER = LoggerFactory.getLogger(RedisReceiver.class);

    @Autowired
    private SimpMessagingTemplate template;

    private Gson gson = new Gson();

    private AtomicInteger counter = new AtomicInteger();

    public void receiveMessage(String message) {
        LOGGER.info("RedisReceiver received <" + message + ">");
        this.template.convertAndSend("/topic/greetings",
                gson.toJson(new Greeting(message)));
        counter.incrementAndGet();
    }

    public int getCount() {
        return counter.get();
    }
}
To access redis server , we should provide the server ip address and ports in your src/main/resources/application.properties:
spring.redis.host=10.1.1.165
spring.redis.port=6379
spring.redis.password=
3.4 Build a websocket message broker
We need a message broker to accept new messages and push it to the html web page.
First , Configure our websocket server as follows:
import org.springframework.context.annotation.Configuration;
import org.springframework.messaging.simp.config.MessageBrokerRegistry;
import org.springframework.web.socket.config.annotation.EnableWebSocketMessageBroker;
import org.springframework.web.socket.config.annotation.StompEndpointRegistry;
import org.springframework.web.socket.config.annotation.WebSocketMessageBrokerConfigurer;

@Configuration
@EnableWebSocketMessageBroker
public class WebSocketConfig implements WebSocketMessageBrokerConfigurer {

    @Override
    public void configureMessageBroker(MessageBrokerRegistry config) {
        config.enableSimpleBroker("/topic");
    }

    @Override
    public void registerStompEndpoints(StompEndpointRegistry registry) {
        registry.addEndpoint("/gs-guide-websocket").withSockJS();
    }

}
In the above code, we do the following jobs:
- We use annotation
@EnableWebSocketMessageBrokerwith@Configurationto enable broker-backed messaging over WebSocket using a higher-level messaging sub-protocol. - In the method
configureMessageBroker, we enabled the simple message broker on topic “/topic”, then in the client , we can subscribe to this topic. - In the method
registerStompEndpoints, we added an endpoint namedgs-guide-websocketwith sockjs enabled. What is.withSockJs()? It’s just used to enable SockJS fallback options.
The following picture shows the diagram of websocket-based message processing.
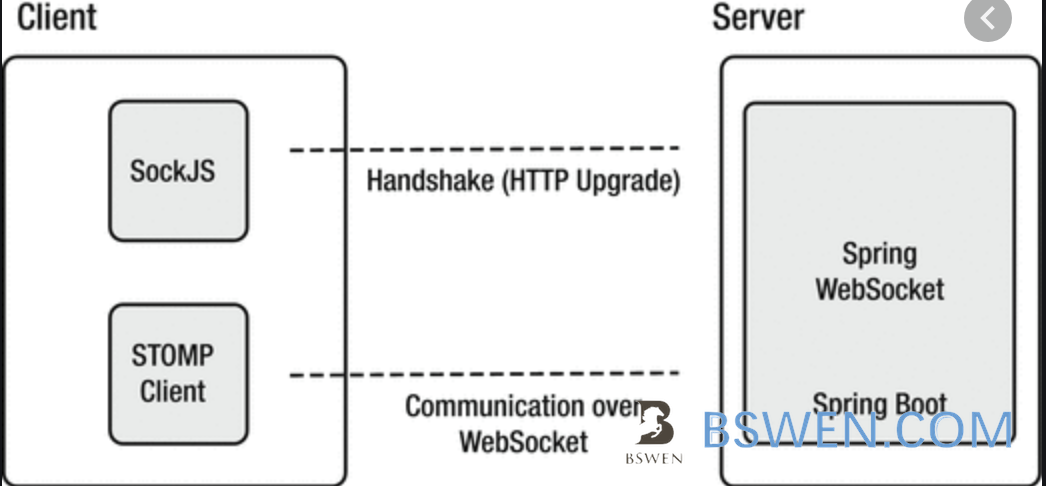
SockJS is a browser JavaScript library that provides a WebSocket-like object. SockJS gives you a coherent, cross-browser, Javascript API which creates a low latency, full duplex, cross-domain communication channel between the browser and the web server.
3.5 Build a web html page to show the pushed message in real time
Now we can use sock.js to develop a web page to subscribe to the websocket server and display the new message in real time.
Create a file src/main/resources/static/app.js with the following content:
var stompClient = null;

function setConnected(connected) {
    $("#connect").prop("disabled", connected);
    $("#disconnect").prop("disabled", !connected);
    if (connected) {
        $("#conversation").show();
    }
    else {
        $("#conversation").hide();
    }
    $("#greetings").html("");
}

function connect() {
    var socket = new SockJS('/gs-guide-websocket');
    stompClient = Stomp.over(socket);
    stompClient.connect({}, function (frame) {
        setConnected(true);
        console.log('Connected: ' + frame);
        stompClient.subscribe('/topic/greetings', function (greeting) {
            showGreeting(JSON.parse(greeting.body).content);
        });
    });
}

function disconnect() {
    if (stompClient !== null) {
        stompClient.disconnect();
    }
    setConnected(false);
    console.log("Disconnected");
}

function sendName() {
    stompClient.send("/app/hello", {}, JSON.stringify({'name': $("#name").val()}));
}

function showGreeting(message) {
    $("#greetings").append("<tr><td>" + message + "</td></tr>");
}

$(function () {
    $("form").on('submit', function (e) {
        e.preventDefault();
    });
    $( "#connect" ).click(function() { connect(); });
    $( "#disconnect" ).click(function() { disconnect(); });
    $( "#send" ).click(function() { sendName(); });
});
Then build a web page (src/main/resources/static/index.html) as follows:
<!DOCTYPE html>
<html>
<head>
    <title>Hello WebSocket</title>
    <link href="/webjars/bootstrap/css/bootstrap.min.css" rel="stylesheet">
    <link href="/main.css" rel="stylesheet">
    <script src="/webjars/jquery/jquery.min.js"></script>
    <script src="/webjars/sockjs-client/sockjs.min.js"></script>
    <script src="/webjars/stomp-websocket/stomp.min.js"></script>
    <script src="/app.js"></script>
</head>
<body>
<noscript><h2 style="color: #ff0000">Seems your browser doesn't support Javascript! Websocket relies on Javascript being
    enabled. Please enable
    Javascript and reload this page!</h2></noscript>
<div id="main-content" class="container">
    <div class="row">
        <div class="col-md-6">
            <form class="form-inline">
                <div class="form-group">
                    <label for="connect">WebSocket connection:</label>
                    <button id="connect" class="btn btn-default" type="submit">Connect</button>
                    <button id="disconnect" class="btn btn-default" type="submit" disabled="disabled">Disconnect
                    </button>
                </div>
            </form>
        </div>
        <div class="col-md-6">
            <form class="form-inline">
                <div class="form-group">
                    <label for="name">What is your name?</label>
                    <input type="text" id="name" class="form-control" placeholder="Your name here...">
                </div>
                <button id="send" class="btn btn-default" type="submit">Send</button>
            </form>
        </div>
    </div>
    <div class="row">
        <div class="col-md-12">
            <table id="conversation" class="table table-striped">
                <thead>
                <tr>
                    <th>Greetings</th>
                </tr>
                </thead>
                <tbody id="greetings">
                </tbody>
            </table>
        </div>
    </div>
</div>
</body>
</html>
3.6 Start the server and test
Start the server as follows:
$ mvn spring-boot:run
Access the web page as follows:
http://localhost:8080
You would get this in the browser:

Click connect in the top buttons, and then open a redis-cli client:
$ sudo docker exec -it my-first-redis sh
# redis-cli
127.0.0.1:6379> publish chat "test"
Then the message should be shown on the page:
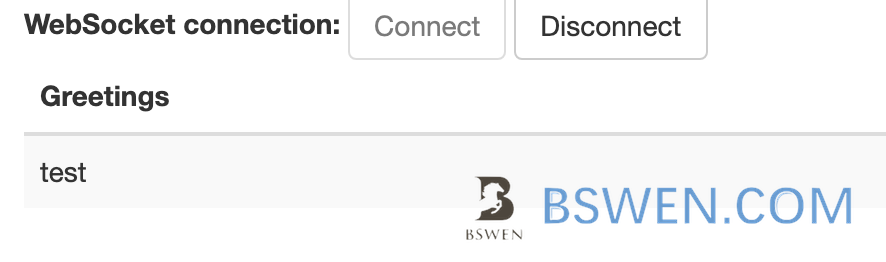
Now it works!
4. Summary
In this post, I demonstrated how to implement a real-time messaging system by using redis pub/sub and websockets. The example code has been uploaded to this github repository, just clone and test.